
Kilan Larsen
470 Blog Post 5
During this sprint I completed a handful of new upgrades, and then spent the rest of my time working on a dialogue system for the tutorial that is faster and easier to use than my previous system.
The first new upgrade option that I created was the CCTV Camera - Facial Recognition. This upgrade allows cameras to send alerts when a thief walks in front of them in the same manner as the laser and audio sensor alerts. The code was more or less all written out already in different areas, I just needed to put it together and create some new UI assets for it.
• As a player, I want to have a CCTV facial recognition upgrade so that I can empower my defenses

At first I thought to make the icon for this upgrade that of a camera, but determined that it would be better if it were the face of a thief. To best depict the face of a thief, I used a black cloth mask around the eyes and on the head, which evokes an old-school bandit sort of look. I was able to re-use this icon for the button of the upgrade as well, to maintain a consistent and easy to understand look for it. I'd say I'm happy with how this one turned out.


The next upgrade that I worked on was a Laser Sensor - Pinpoint. This upgrade simply sets the position of the laser alert to the exact spot where the thief touched the laser, which can be quite helpful.
• As a player, I would like a pin point upgrade for the laser sensor so that I can accurately detect where the thief is when they cross the laser

I'm also quite happy with how the upgrade button icon for the Pinpoint upgrade turned out, it's simple but but effective in its design I think.
This upgrade has so far proven very popular among play-testers so I'm glad I came up with the idea to add it into the game :)

Afterwards, I began a task that I've actually been wanting to do for awhile now - CCTV Camera Rotation, and an Auto-Rotation upgrade.
• As a player, I want to be able to rotate my camera when I place it so that I can get a more accurate look at exactly where I want to point it.
• As a player, I want to have a CCTV rotation upgrade so that I can rotate my cameras


I knew from the start that this task was going to prove a bit challenging, rotation based stuff usually is. I actually managed to figure out the camera pointing towards the mouse pretty quickly, but I struggled to ensure that the camera could not be pointed backwards into the wall. The issue was that the cameras can be placed facing in four different directions which changes the rotation values, making it difficult to lock the rotation values between specific values in all cases without hard-coding all of it. The solution was to look at just the local rotation values, which will always need to be between 0-180 degrees, and bound the local camera rotation by that amount. Once this was figured out, adding the UI and getting the cameras to rotate back and forth automatically was extremely easy.
For my last tasks of the sprint, I set up a spreadsheet to detail the different tutorial tasks that we needed then built the dialogue system and related material for that tutorial to work.
• As a designer, I want there to be a spreadsheet that tracks what systems we are learning on what night so that what tools I have access to is properly planned around.
• As a player I would like a tutorial system for the first level so that I have a way of learning the game bit by bit before being given full reins to do as I wish.
This is the spreadsheet that I created of different tutorial mechanics to teach the player, and if I'm being honest with myself it's pretty rubbish and not well thought out. A decent amount of what I wrote for 'teaching method' is simply not accurate to what I ended up using in the final version.
That said, it's still a decent enough reference for all of the different things that need to be taught to the player, which is helpful.

For the dialogue system, I started by following a Brackeys YouTube tutorial to build a good framework for it and then added in some elements of my own to make it more useful for this particular game project.
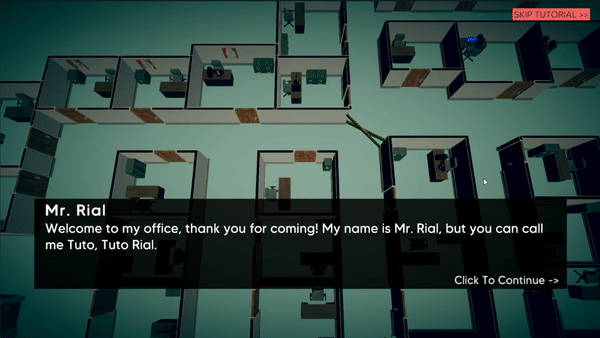
I decided that for all of the different skill checks in the tutorial such as placing specific security measures and then selecting them, I wanted to be able to set and re-organize them from the inspector if needed instead of hard-coding them. To do this, I created an enum with the name of each skill check, and each dialogue sequence can have a skill check enum publicly set at the end.
As you can see in the image on the right, the first dialogue sequence has 3 sentences, where the first two are 'click to continues' and then during the third sentence the 'CCTV Placement' skill check begins. Once the skill check is complete, it moves to the next dialogue sequence, which immediately begins the 'Select CCTV' skill check.

Overall I'm pretty happy with how this system came out but it could still used a few tweaks. For instance, the dialogue box can get in the way of performing some of the skill checks, which is a bit annoying for players. I'll have to fine tune this in the next sprint to make it more user-friendly.
For Sprint 6 I am planning on implementing the final upgrade options, make adjustments to the game based on playtest feedback, and work on some menu UI tasks.
- Audio Sensor Upgrade: Directional Signal
- Guard Upgrades: Taser, Better Pay (Speed and Efficiency improvement)
- Main Menu
- Level Selection Screen
- Credits Screen
Only two more Sprints to go!